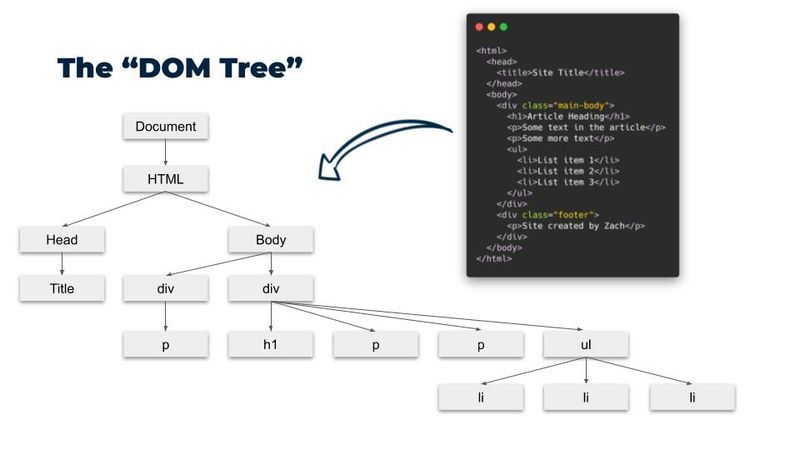
What is DOM?
The Document Object Model (DOM) is a programming interface for web documents, specifically HTML.
It represents the structure of a document as a logical tree, where each element, attribute, and piece of text in the document is represented as a node in the tree.
Through the DOM, developers can dynamically add, remove, and modify elements, change their attributes, update their text content, and apply styles, enabling interactive and dynamic web experiences.
The DOM organizes the document into a hierarchical tree, with the document object as the root
It is a live tree, which means, any update we do in the DOM tree will be reflected on UI (browser) immediately.

Updating DOM using JS
Document Object
To update the HTML page, we can make changes in the DOM tree using the document object.
Document object has function to access HTML elements in the DOM tree, create and add new HTML element into the DOM tree, update properties of existing/new HTML elements.
Getting Elements
To update an existing element, first we need to get access to that element
There are many functions in document object that we can use to get a reference(access) to an html element
- document.getElementById(" Element's id "): Returns first html element matching the given ID or null if no element is found
- document.getElementByClassName(" Element's class "): Returns list of elements or null if no element is found
- document.getElementByTagName(" html tag "): Returns list of elements or null if no element is found
- document.querySelector(" css selector "): Returns the first matching html element matching the css selector or null if no element is found
- document.querySelectorAll(" css selector "): Returns list of html elements matching the css selector or null if no element is found
// getElementById: h1 with id of pageTitle
const h1Element = document.getElementById("pageTitle");
// querySelector: h1 with id of pageTitle
const h1Element = document.querySelector("#pageTitle")
Update Content
Once you have element's reference, you can change what's inside it.
To change the content we can use innerHTML property of the html element object
// get header and update to content to say "hello world!"
const h1Element = document.querySelector("#pageTitle")
h1Element.innerHTML = "Hello World!"
To change the styling of html element we can use style property of html element object.
// update background color of footer
const footer_element = document.querySelector("footer");
footer_element.style.backgroundColor = "red";
Another way to update styling of an element is to add/remove css class.
To add/remove class we can use classList property of html element. It represents the list of classes of an element.
// add hide class to nav element
const navElement = document.querySelector("nav");
navElement.classList.add("hide");
Create Element
To create a new html element we can use createElement method of document object.
This method will create a new html element and return its reference.
Once the element is created we can update its properties as per our requirements using above defined ways (and there are many more things that we can do).
Just by creating the element does not make it visible on UI. Remember that DOM tree represents structure of html page, so we have to add this newly created html element to the DOM tree to make it visible.
To add the newly created html element to the DOM tree we can appendChild() method of document object.
// Create a new heading "Test Heading" and add it below this section
const newHeading = document.createElement("h1");
newHeading.innerHTML = "Test Heading";
newHeading.style.color = "red";
// h1 is created, now add it to the page
document.querySelector("main").appendChild(newHeading);
Event Handling
User can interact with the webpage by performing actions like click a button, type into a box, move yoru mouse around, scroll up and down.
All this actions generate events and we can write code in JS to react (listen or handle) these events. It is called Event Handling.
We do event handling to make the webpage interactive and dynamic. Without it, webpage would just be static text and images.
To do event handling we need to perform following steps:
- 1.) Get a reference to the html element (target) on which we want to handle events, like a button or anchor tag.
- 2.) Define the event handler function in which you define what you want to do when the event happens, like when button is clicked open the menu.
- 3.) Attach the event handler to the target element along with the event on which you want to perform the action, like click event, keyboard event.
// add "click" event handler on "footer" and show alert dialog
const footerEle = document.querySelector("footer"); // step 1
function handleClickEvent() { // step 2
console.log("Handling Click Event");
alert("Footer is clicked !!");
}
footerEle.addEventListener("click", handleClickEvent); // step 3
Output
</>
